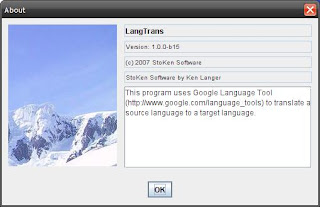
For me, build numbers are very useful. I like to use them where I can so I can keep true to a major, minor, and patch version purpose. The only problem is, how do you automate build numbers in a way that is easy to use in an IDE that doesn't automatically use them? The solution is partially included in ANT and the rest is a little bit of simple project setup.
While you are automating things, why not include simple information about your project bundled with each JAR you create. Including:
- Program/Library/Project name
- Author
- Company/Organization
- Copyright
- Description (brief)
- Version (major/minor/patch)
- Build Number
- Build Date
The process is also being described from a JAVA perspective but there isn't anything truly JAVA specific. For this reason, the technique could be ported to other language. I just happen to like JAVA so that is what I am using.
Technique
What we are doing is simple:
- Have ANT create/update a small properties file for us in the root of the jar
- Use a small class or library to open a load this properties file at startup
- Ensure all data is available through static methods for easy access through-out the program
build.xml Setup
In Netbeans (and probably other IDEs) build.xml is a place to create your own custom build targets. A target needs to be setup for "-pre-jar" as follows
<!-- Custom Target for AppInfo.java -->This target can be cut/pasted right into your build.xml as is. It is doing the following:
<target name="-pre-jar">
<buildnumber file="buildnumber.properties"/>
<propertyfile file="appinfo.properties"
comment="Everything can be manually updated except buildnum and builddate.">
<entry key="program.PROGNAME" default="${main.class}" />
<entry key="program.AUTHOR" default="" />
<entry key="program.COMPANY" default="" />
<entry key="program.COPYRIGHT" default="now" type="date" pattern="yyyy" />
<entry key="program.DESCRIPTION" default="" />
<entry key="program.VERSION" default="1.0.0" />
<entry key="program.BUILDNUM" value="${build.number}" />
<entry key="program.BUILDDATE" type="date" value="now" pattern="yyyyMMDDHHmmss" />
</propertyfile>
<copy file="appinfo.properties" todir="${build.classes.dir}"/>
</target>
- Defines an implementation for -pre-jar to the build system
- Creates a new buildnumber to be stored in buildnumber.properties.
- Creates a new propertyfile called appinfo.properties. Within propertyfile many entries are created. All the entries are set to a default that can be updated by hand. These entry tags do not have a value="..." attribute within the tag. The ones with the value="..." will get updated at each build. In this case, the only entry tags affected are BUILDNUM and BUILDDATE.
- Does a copy of the appinfo.properties file to the build.classes.dir so it can be included in the jar for this project.
buildnumber.properties
This is a file created and maintained by ANT. If you delete it, ANT will create another starting at 1. The file will look something like this.
With each build, the build.number will be incremented by 1. You do not need to do anything with this file going forward since ANT maintains it.#Build Number for ANT. Do not edit!
#Sat Apr 14 01:25:36 EDT 2007
build.number=1
appinfo.properties
All of the project summary information will be stored in here. After your first build, there isn't much but you can update the static fields as you see fit. The following is a file that was updated for a specific project.
I manually updated all the fields (using the rules of property files) above except BUILDNUM and BUILDDATE since they get updated dynamically. This is the file that will be included in the JAR output of your project.#Everything can be manually updated except buildnum and builddate.
#Sat Apr 14 01:25:36 EDT 2007
program.PROGNAME=LangTrans
program.BUILDNUM=15
program.AUTHOR=Ken Langer
program.DESCRIPTION=This program uses Google Language Tool.(...)
program.BUILDDATE=200704104012536
program.COPYRIGHT=2007
program.COMPANY=StoKen Software
program.VERSION=1.0.0
Using appinfo.properties
Usage can be done in two ways. You can either roll-your-own, or use a pre-existing library I created.
Roll-Your-Own
Rolling your own is not to bad. Simply open the appinfo.properties file as follows:
That is it. Accessing the values can be done using the props.getProperty(key); method.InputStream in = null;
Properties props = new Properties();
//
// load properties file
//
try {
//
// get Application information
//
in = getClass().getResourceAsStream("/appinfo.properties");
props.load(in);
// DO SOMETHING HERE WITH THE props object....
in.close();
} catch (IOException ex) {
ex.printStackTrace();
} // end-try-catch
Using Pre-Existing Library
To save me time, I created a simple library (that will get more tools added over time) that has much of this already setup. If you are interested, see stoken
 -utils. There is a class within the project all AppInfo that you can hand props (from above). It has some simple static accessors you can use for getting the key values you need.
Within the same library, you will see AppInfoPanel which can be stuck into a JFrame for creating a spiffy about box.
Both are used in a sample program I wrote called language-translate. If you look through this program you will see the usage of both.
Either approach above still requires the build.xml configuration but the second one already knows what to do with it after build.xml does its magic.
Final Thoughts
The technique above should allow you to simply and easily include build numbers and other centrally controlled project information.
UPDATE: I just discovered that if you have the compile on save feature in Netbeans 6.5 on, it seems to prevent appinfo.properties from being copied into your build/classes/... folder. This means that any executions within the IDE will probably fail or have errors/exceptions. I will look at a way around this but until then, turn off compile on save and just do a classic SHIFT+F11 to built before a test run.