Today I downloaded and installed Netbeans 6.7. My first impressions are very good. The performance seems better and I really like what was done for unit testing.
I have used it under Windows and Linux. Thanks Netbeans team!! Another great version delivered right on time.
Showing posts with label NETBEANS. Show all posts
Showing posts with label NETBEANS. Show all posts
Monday, June 29, 2009

Friday, October 17, 2008
POLL: What Version of Netbeans do you use? (Results)
Here are the results from our poll of Netbeans version used.
- 73% 6.0
- 19% I don't use Netbeans
- 14% 5.5/5.5.1
- 03% 5.0
- 01% 4.x
Monday, April 28, 2008
Netbeans 6.1
I install Netbeans 6.1 today and it delivers all expected. A few points, then I want to get back to playing...
I am very happy. Well back to it.
UPDATE: I have been using Netbeans 6.1 for about a month. Several weeks ago, I switch to Ubuntu Linux 8.04 too. Both are working very very well.
- It starts faster
- It runs faster
- It looks clean
- It has improved code complete
- ....
I am very happy. Well back to it.
UPDATE: I have been using Netbeans 6.1 for about a month. Several weeks ago, I switch to Ubuntu Linux 8.04 too. Both are working very very well.
Wednesday, February 27, 2008
HOWTO: create data aware applications in NetBeans 6.0
Roumen Strobl created a very clear and easy to follow flash demo describing how to create data aware applications using NetBeans 6.0. In the demo, Roumen covers 3 topics:
Somewhere on this page you will find a link to Roumen's weblog. It is on my "bookmark me" list.
- Process for connecting to a MySQL database
- Steps to create a "data aware" Swing Application that talks to MySQL
- Steps to create a REST based web service for accessing the same database
Somewhere on this page you will find a link to Roumen's weblog. It is on my "bookmark me" list.
Sunday, February 24, 2008
SOLUTION: Web Service Testing in Netbeans 6.0.1 gets ClassNotFound Exception
Overview
Recently, I have been working on creating some web services using NetBeans 6.0/6.0.1. I have done this before and I wasn't creating anything to crazy. I decided to try them out using the new handy Web Services feature that is in the Services tab of the NetBeans 6.0.1 IDE. Within this feature, you can add a WSDL file and look at the features available for consumption from the web service. My favorite aspect of this is that you can right click on any method and test it. A form opens so you can provide parameters. Once submitted, results are returned in an object. This object can be drilled into for more details.
Using this testing feature, I ran into an odd issue however. I created a new WS that I wanted to experiment with. Again, nothing fancy. When I setup the WS in the NetBeans Web Services area, they were added without errors. However, when I tested them, I got a ClassNotFound exception. I looked at everything but got the same results. I even deployed them on a different server that is running a newer build of Tomcat but got the same results. I wrote a simple client that consumed the WS and it _did_ work...? That was not expected. I looked that the issue from many different angles but could not see an obvious cause. Then something occurred to me...
Workaround
My web service name was all lowercase. Since a web service can be considered a class so it should start with an upper case character. This is normally my convention however, this was just a simple experiment.
Basically, I had something like:
https://www.inhouse.headache.net/timezonews/convertWS?wsdl
That should have been like:
https://www.inhouse.headache.net/timezonews/ConvertWS?wsdl
Once I created my Web Service to start with an upper case character, everything worked. I have not read to see if a web service MUST start with an upper case character. If anyone knows the answer, please post
Final Thoughts
This was an odd issue that I ran into using NetBeans. I hope anyone out there who runs into the same thing reads this solution before they lose to much time.
Happy developing using NetBeans.
Recently, I have been working on creating some web services using NetBeans 6.0/6.0.1. I have done this before and I wasn't creating anything to crazy. I decided to try them out using the new handy Web Services feature that is in the Services tab of the NetBeans 6.0.1 IDE. Within this feature, you can add a WSDL file and look at the features available for consumption from the web service. My favorite aspect of this is that you can right click on any method and test it. A form opens so you can provide parameters. Once submitted, results are returned in an object. This object can be drilled into for more details.
Using this testing feature, I ran into an odd issue however. I created a new WS that I wanted to experiment with. Again, nothing fancy. When I setup the WS in the NetBeans Web Services area, they were added without errors. However, when I tested them, I got a ClassNotFound exception. I looked at everything but got the same results. I even deployed them on a different server that is running a newer build of Tomcat but got the same results. I wrote a simple client that consumed the WS and it _did_ work...? That was not expected. I looked that the issue from many different angles but could not see an obvious cause. Then something occurred to me...
Workaround
My web service name was all lowercase. Since a web service can be considered a class so it should start with an upper case character. This is normally my convention however, this was just a simple experiment.
Basically, I had something like:
https://www.inhouse.headache.net/timezonews/convertWS?wsdl
That should have been like:
https://www.inhouse.headache.net/timezonews/ConvertWS?wsdl
Once I created my Web Service to start with an upper case character, everything worked. I have not read to see if a web service MUST start with an upper case character. If anyone knows the answer, please post
Final Thoughts
This was an odd issue that I ran into using NetBeans. I hope anyone out there who runs into the same thing reads this solution before they lose to much time.
Happy developing using NetBeans.
Monday, January 7, 2008
POLL: What is your favorite IDE (Results)
After several month of polling the favorite IDE results in in.
- 65% Netbeans
- 30% Eclipse
- 2% Microsoft Visual Studio
- 2% IBM Visual Age
Friday, October 5, 2007
HOWTO: install/upgrade SUN Java under linux
Overview
For those of us using a flavor of linux that does not come with SUN Java (which is currently most of us), you may have run into a bit of a problem. Linux distros typically bundle the the GCC GCJ compiler. Sure, it is probably nice and all but I personally prefer SUN Java. It is what is installed on most non-linux based computers out there. It is the standard.
I, like others out there, have probably tried to remove GCJ from their systems. Well, it is not easy since everything Java that comes with the distro is bound to it. Arg!
The next option is to see if you can get SUN Java and GCJ to co-exist, so you install SUN Java anyway, and run
java -version. You still see GCJ's version. Arg! Why? because the GCJ's java is in the path.
You could setup all the path and JAVA_HOME/JAVA_PATH environment variable but, for me, that is just not enough. I want my environment to just use SUN Java. Outside of simply having 1 flavor of Java installed, this is the way to go. Make SUN Java the default Java.
Purpose
The following will describe the rather simple process for getting SUN Java to be the default Java. This is being done under Fedora Core 6 and 7 (RPM based), however, the technique should work for other distros. I am using SUN Java JDK 6 and am upgrading from 6u2 to 6u3. The process of upgrade or install is the same except for removing the old version :-) The most important aspect is the steps to follow.
Required Downloads
The example will be done installing SUN Java JDK 6 Update 3 (6u3) to replace SUN Java JDK 6 Update 2 (6u2).
Install/Upgrade
Creating your own sun-compat RPM (where sun-compat <> JDK)
Well, you were eager and could not wait for the jpackage guys to create a java-1.6.0-sun-compat-1.6.0.03-1jpp.i586.rpm for you. You just want the latest JDK working. Sound like me. No problems. You have already download the source file (java-1.6.0-sun-compat-1.6.0.02-1jpp.src.rpm or similar) so you can make your own. You have also installed it (3rd bullet above).
To make your own sun-compat RPM just do the following:
java version "1.6.0_03"
Java(TM) SE Runtime Environment (build 1.6.0_03-b05)
Java HotSpot(TM) Client VM (build 1.6.0_03-b05, mixed mode, sharing)
That is it.
Clean-Up After Successfull Install/Upgrade
Once you are sure everything is using the new version, you can (if desired) rpm -e your old jdk. Since SUN JDK 6 creates a symlink from the current version as "latest" there isn't much risk of using the old version... I did say "much" risk. I prefer removing the old once I confirm the new one is safe and stable.
Netbeans
To tell programs like Netbeans (we are all using it after all) to use the new JDK, simply update the JDK version in $NETBEANS_HOME/etc/netbeans.conf where $NETBEANS_HOME is the location of the netbeans install. That will affect all users of that install globally.
Java WebStart
I love WebStart, however, for some odd reason, desktop shortcuts created for linux (GNOME) hard code the full path (including version) to the javaws program. This is stupid since they should really just point to "latest". Regardless, you can either de-install/re-install the Java WebStart apps, or do the lazy approach and just edit the *.desktop files in your ~/Desktop/ directory. Just update the JDK version to match the current version.
Final Thoughts
This may seem like a long process but the steps are basic and easy. I keep the sun-compat source installed on my system and update the version number each time a new JDK comes out. I only get a new src and i586 version for new major JDK releases (i.e. JDK 5 to JDK 6). This makes the update process take a few minutes. About the same time it takes in Windows to update the PATH of the System Environment.
I hope these steps help it become easier for you too. I also hope that this blog become obsolete and that linux distros start bundling real SUN Java by default. It just the right thing to do. Some distros are already doing this. Fedora? Do you hear this? :-)
BTW
For Ubuntu, this may work. I need to try it.
http://coffeecokeandcode.blogspot.com/2008/09/installing-java-6-update-10-on-ubuntu.html
For those of us using a flavor of linux that does not come with SUN Java (which is currently most of us), you may have run into a bit of a problem. Linux distros typically bundle the the GCC GCJ compiler. Sure, it is probably nice and all but I personally prefer SUN Java. It is what is installed on most non-linux based computers out there. It is the standard.
I, like others out there, have probably tried to remove GCJ from their systems. Well, it is not easy since everything Java that comes with the distro is bound to it. Arg!
The next option is to see if you can get SUN Java and GCJ to co-exist, so you install SUN Java anyway, and run
java -version. You still see GCJ's version. Arg! Why? because the GCJ's java is in the path.
You could setup all the path and JAVA_HOME/JAVA_PATH environment variable but, for me, that is just not enough. I want my environment to just use SUN Java. Outside of simply having 1 flavor of Java installed, this is the way to go. Make SUN Java the default Java.
Purpose
The following will describe the rather simple process for getting SUN Java to be the default Java. This is being done under Fedora Core 6 and 7 (RPM based), however, the technique should work for other distros. I am using SUN Java JDK 6 and am upgrading from 6u2 to 6u3. The process of upgrade or install is the same except for removing the old version :-) The most important aspect is the steps to follow.
Required Downloads
The example will be done installing SUN Java JDK 6 Update 3 (6u3) to replace SUN Java JDK 6 Update 2 (6u2).
- download SUN Java
- Site: http://java.sun.com/
- I used the RPM based install package called jdk-6u3-linux-i586-rpm.bin
- download java-1.6.0-sun-compat-1.6.0.xx-1jpp.i586.rpm where xx is your update version (01, 02, 03,..)
- Site: http://www.jpackage.org/browser/
- In this case, we are trying to download a sun-compat for JDK 1.6.0.03 or 6u3. That is what I hope to find...
- If a version for your JDK is not available, go on to step #3. This is my case for this example.
- download the source file java-1.6.0-sun-compat-1.6.0.xx-1jpp.src.rpm where xx is the latest available version.
- Site: http://www.jpackage.org/browser/
- At the time of the writing, 1.6.0.02 was the only sun-compat available which is a version behind 6u3. This is ok.
Install/Upgrade
- Install SUN JAVA
- command: sh jdk-6u3-linux-i586-rpm.bin
- agree to the terms by typing "yes"
- You will see it install a bunch of RPMs into /usr/java/ and /opt/sun/
- If your java 1.6.0-sun-compat RPM version matches your JDK...
- command: rpm -Uvh java-1.6.0-sun-compat-1.6.0.03-1jpp.i586.rpm
- you are done
- If it does not match then install...
- command: rpm -ivh java-1.6.0-sun-compat-1.6.0.02-1jpp.src.rpm
- as above, version 02 was the only version availble
- you are not done yet.
Creating your own sun-compat RPM (where sun-compat <> JDK)
Well, you were eager and could not wait for the jpackage guys to create a java-1.6.0-sun-compat-1.6.0.03-1jpp.i586.rpm for you. You just want the latest JDK working. Sound like me. No problems. You have already download the source file (java-1.6.0-sun-compat-1.6.0.02-1jpp.src.rpm or similar) so you can make your own. You have also installed it (3rd bullet above).
To make your own sun-compat RPM just do the following:
- cd to /usr/src/redhat/SPECS/ (the source directory may be different on other distros)
- edit java-1.6.0-sun-compat.spec using your favorite text editor
- At the top of the file you will see %define buildver 02
- For this example we want 6u3 so buildver should be changed from "02" to "03".
- Save and close the file.
- Make your RPM
- command: rpmbuild -ba java-1.6.0-sun-compat.spec
- stuff happens...
- Look in /usr/src/redhat/RPMS/i586/ and you will see java-1.6.0-sun-compat-1.6.0.03-1jpp.i586.rpm
- install it
- command: rpm -Uvh java-1.6.0-sun-compat-1.6.0.03-1jpp.i586.rpm
java version "1.6.0_03"
Java(TM) SE Runtime Environment (build 1.6.0_03-b05)
Java HotSpot(TM) Client VM (build 1.6.0_03-b05, mixed mode, sharing)
That is it.
Clean-Up After Successfull Install/Upgrade
Once you are sure everything is using the new version, you can (if desired) rpm -e your old jdk. Since SUN JDK 6 creates a symlink from the current version as "latest" there isn't much risk of using the old version... I did say "much" risk. I prefer removing the old once I confirm the new one is safe and stable.
Netbeans
To tell programs like Netbeans (we are all using it after all) to use the new JDK, simply update the JDK version in $NETBEANS_HOME/etc/netbeans.conf where $NETBEANS_HOME is the location of the netbeans install. That will affect all users of that install globally.
Java WebStart
I love WebStart, however, for some odd reason, desktop shortcuts created for linux (GNOME) hard code the full path (including version) to the javaws program. This is stupid since they should really just point to "latest". Regardless, you can either de-install/re-install the Java WebStart apps, or do the lazy approach and just edit the *.desktop files in your ~/Desktop/ directory. Just update the JDK version to match the current version.
Final Thoughts
This may seem like a long process but the steps are basic and easy. I keep the sun-compat source installed on my system and update the version number each time a new JDK comes out. I only get a new src and i586 version for new major JDK releases (i.e. JDK 5 to JDK 6). This makes the update process take a few minutes. About the same time it takes in Windows to update the PATH of the System Environment.
I hope these steps help it become easier for you too. I also hope that this blog become obsolete and that linux distros start bundling real SUN Java by default. It just the right thing to do. Some distros are already doing this. Fedora? Do you hear this? :-)
BTW
For Ubuntu, this may work. I need to try it.
http://coffeecokeandcode.blogspot.com/2008/09/installing-java-6-update-10-on-ubuntu.html
Tuesday, September 18, 2007
HOWTO: setup Java to trust unsigned SSL CERTs
Overview
If you have an application that needs to talk to a web service (or page) that uses SSL, you may get an ugly error the first time you connect.
javax.net.ssl.SSLHandshakeException: sun.security.validator.ValidatorException: PKIX path building failed:
sun.security.provider.certpath.SunCertPathBuilderException:
unable to find valid certification path to requested target.....
This is probably because you have a self-signed CERT. This is ok and can be dealt with easily following a few simple steps. Yes the following looks like a lot of steps but I was very verbose.... as usual.
Technique
There are a few steps you need to follow to get your JAVA application to trust the self-signed CERT.
Export the Site's CERT
There are probably more then one way to do this. I prefer to use a small application I found called portecle. In a few clicks you can create a keystore and import a CERT into it.
Load the keystore of Trusted CERTs
My preferred way is to include a properties file within my JAR and then use that to point to an external keystore (JKS) file.
The following code can be executed at application startup. Once done, it should work for the life of your application.
Another way to do this is to use an environment variable
This procedure should allow your application to access SSL protected data that is self-signed. If anyone know how to get the CERT using Firefox, let me know.
If you have an application that needs to talk to a web service (or page) that uses SSL, you may get an ugly error the first time you connect.
javax.net.ssl.SSLHandshakeException: sun.security.validator.ValidatorException: PKIX path building failed:
sun.security.provider.certpath.SunCertPathBuilderException:
unable to find valid certification path to requested target.....
This is probably because you have a self-signed CERT. This is ok and can be dealt with easily following a few simple steps. Yes the following looks like a lot of steps but I was very verbose.... as usual.
Technique
There are a few steps you need to follow to get your JAVA application to trust the self-signed CERT.
Export the Site's CERT
- Visit your target URL (web service or whatever) using IE 6.0. I am not sure how to do this using Firefox.
- Doubleclick on the "gold lock" symbol at the bottom of the browser.
- You will get a "Certificate" window. Select the "Details" tab and click "Copy to File...". A wizard will open
- Click "Next" and you will see "Export File Format". Select "Base-64 encoded X.509 (.CER). Click "Next"
- Select a filename and location. Click "Next".
- Click Finish. You have now saved the cert. The file should look like a block of letters and numbers in a text editor.
There are probably more then one way to do this. I prefer to use a small application I found called portecle. In a few clicks you can create a keystore and import a CERT into it.
Load the keystore of Trusted CERTs
My preferred way is to include a properties file within my JAR and then use that to point to an external keystore (JKS) file.
The following code can be executed at application startup. Once done, it should work for the life of your application.
Properties defaultProps = new Properties();The cert.properties file simply holds the path to the keystore.
InputStream in;
try {
in = ArkaProWSClient.class.getResourceAsStream("/mypackage/cert.properties");
defaultProps.load(in);
in.close();
System.setProperty("javax.net.ssl.trustStore",defaultProps.getProperty("javax.net.ssl.trustStore"));
System.out.println("DEBUG: " + defaultProps.getProperty("javax.net.ssl.trustStore"));
} catch (Exception ioex) {
ioex.printStackTrace();
} // end-try-catch
javax.net.ssl.trustStore=C:\\certs\\trustcert.jksThis code will
- open the properties file which is located in /mypackage/ within the jar
- set javax.net.ssl.trustStore system property to the location of my JKS file. This value comes from the cert.properties file.
Another way to do this is to use an environment variable
java -Djavax.net.ssl.trustStore="C:\certs\trustcert.jks" -jar dist\SSLClient.jarFinal Thoughts
This procedure should allow your application to access SSL protected data that is self-signed. If anyone know how to get the CERT using Firefox, let me know.
Friday, July 6, 2007
HOWTO: load a file from a JAR into a String using JAVA
Overview
In some cases, a SQL creation script may be embedded in a jar. The following will show how to load this file into a usable object (String) for later passing to JDBC.
Technique
The idea is simple. Pass the path to the SQL script following the file structure of the JAR. In this example, "/derbyfun/sql/create.sql" is the file that is being extracted.
To get the contents of the file, the resource is opened as a stream and wrapped as a BufferedReader. The stream is then read, line by line, until end of file. For each line, the text is appended to a StringBuilder. At the end of the method, the StringBuilder is turned back into a string where it can be used in a JDBC call.
When the file is ready to be loaded, the following call can be used. In this example, the output is going to standard out. The file is in a sub package called sql which is part of "derbyfun".
Final Thoughts
This is pretty straight forward code but may come in handy as a cut/paste for someone who does not remember the syntax... like me.
In some cases, a SQL creation script may be embedded in a jar. The following will show how to load this file into a usable object (String) for later passing to JDBC.
Technique
The idea is simple. Pass the path to the SQL script following the file structure of the JAR. In this example, "/derbyfun/sql/create.sql" is the file that is being extracted.
To get the contents of the file, the resource is opened as a stream and wrapped as a BufferedReader. The stream is then read, line by line, until end of file. For each line, the text is appended to a StringBuilder. At the end of the method, the StringBuilder is turned back into a string where it can be used in a JDBC call.
public String getResourceFileAsString(String resourcefilename) {
  final String newline = System.getProperty("line.separator");
  String line = null;
  URL url = null;
  BufferedReader b = null;
  StringBuilder sb = new StringBuilder();
  int i = 0;

  try {
      //
      // open buffered reader
      //
      b = new BufferedReader(
              new InputStreamReader(
                  Main.class.getResourceAsStream(resourcefilename)
              )
          );

      //
      // priming read and the loop through rest of file
      //
      line = b.readLine();
      while(line != null) {
          //
          // add the line to the Stirng Builder ensuring
          // the newline is re-added
          //
          sb.append(line + newline);
           //
          // just some debug
          //
          System.out.println("DEBUG: [" + ++i + "] " + line);

          //
          // read the next line
          //
          line = b.readLine();
      } // end-while

  } catch(Exception ex) {
      ex.printStackTrace();
  } // end-try-catch

  return(sb.toString());
}
When the file is ready to be loaded, the following call can be used. In this example, the output is going to standard out. The file is in a sub package called sql which is part of "derbyfun".
System.out.println(
  getResourceFileAsString("/derbyfun/sql/create.sql")
  );
Final Thoughts
This is pretty straight forward code but may come in handy as a cut/paste for someone who does not remember the syntax... like me.
Friday, June 29, 2007
HOWTO: add stripes to JList
Overview
Swing has one pretty cool thing. You can customize everything to look anyway you want. The following will show you a simple but useful trick for adding strips to a swing JList component.
Technique
The following class can be put right into a project. You will want to change the package name though. This is all you need to do the striping. Towards the bottom, you will see two setBackground(...) calls. The first is if a row is even and unselected and the other is if the row is even but is selected. Play with the colors until you find ones you like. I am not sure I like the ones below actually.
Final Thoughts
Adding stripes can make the component easier to read. This code is cut/paste - able into a Java file for use in any program. Give it a try.
Swing has one pretty cool thing. You can customize everything to look anyway you want. The following will show you a simple but useful trick for adding strips to a swing JList component.
Technique
The following class can be put right into a project. You will want to change the package name though. This is all you need to do the striping. Towards the bottom, you will see two setBackground(...) calls. The first is if a row is even and unselected and the other is if the row is even but is selected. Play with the colors until you find ones you like. I am not sure I like the ones below actually.
package jliststriping;

import javax.swing.*;
import java.awt.*;

public class StripeRenderer extends DefaultListCellRenderer {
 public Component getListCellRendererComponent(JList list,
     Object value, int index, boolean isSelected, boolean cellHasFocus) {
     JLabel label = (JLabel) super.getListCellRendererComponent(
         list,
         value,
         index,
         isSelected,
         cellHasFocus
         );

     if(index%2 == 0) {
         if(! list.isSelectedIndex(index)) {
             label.setBackground(new Color(230,255,230));
         } else {
             label.setBackground(new Color(255,255,200));
         } // end-if
     } // end-if

     return label;
 }
} // end-class
Once you have this code in your project, the next step is to plug it into your JList. In Netbeans, you simply:- Select your JList in Matisse
- In Properties, look for cellRenderer. Click on the "..."
- Using "Select Mode" "Form Connector" select "User Code"
- type new StripeRenderer() in the text box.
- Click Ok and test it out.
Final Thoughts
Adding stripes can make the component easier to read. This code is cut/paste - able into a Java file for use in any program. Give it a try.
HOWTO: remove multiple items from a JAVA Swing JList
Overview
When using the JList, there are times when you want to edit the list of items. Adding or removing a single item is pretty straight forward, however, there is a trick to removing groups of items from a JList.
For the following example, there is a simple JList that uses the DefaultListModel. The JList is setup with a MULTIPLE_INTERVAL selection model.
Technique
Last Thoughts
This approach will let you grab any interval from a JList and remove them. Hopefully SUN will update this component to better handle this in the future. This will remove the need for a trick.
When using the JList, there are times when you want to edit the list of items. Adding or removing a single item is pretty straight forward, however, there is a trick to removing groups of items from a JList.
For the following example, there is a simple JList that uses the DefaultListModel. The JList is setup with a MULTIPLE_INTERVAL selection model.
Technique
DefaultListModel dlm = (DefaultListModel) this.jList.getModel();

if(this.jList.getSelectedIndices().length > 0) {
  int[] tmp = this.jList.getSelectedIndices();
  int[] selectedIndices = this.jList.getSelectedIndices();

  for (int i = tmp.length-1; i >=0; i--) {
      selectedIndices = this.jList.getSelectedIndices();
      dlm.removeElementAt(selectedIndices[i]);
  } // end-for
} // end-if
Last Thoughts
This approach will let you grab any interval from a JList and remove them. Hopefully SUN will update this component to better handle this in the future. This will remove the need for a trick.
HOWTO: properly start a Java Swing Application from main
Overview
When starting a JAVA Swing application, is is not always clear on the proper way to fire it up. If you use Netbeans, it provides you with a nice stub in main for doing this.
Technique
To start a JAVA Swing application...
The rest ensures that the application starts on the correct thread and makes the application visible.
Final Thoughts
This can be used to ensure a smooth startup of a Swing application.
When starting a JAVA Swing application, is is not always clear on the proper way to fire it up. If you use Netbeans, it provides you with a nice stub in main for doing this.
Technique
To start a JAVA Swing application...
public static void main(String args[]) {
  java.awt.EventQueue.invokeLater(new Runnable() {
      public void run() {
          UIManager.put("swing.boldMetal", Boolean.FALSE);
          new JListStripingForm().setVisible(true);
      }
  });
}
The UIManager.put(...) line turns off the BOLD for all menus and such. I think it makes the program look bad.The rest ensures that the application starts on the correct thread and makes the application visible.
Final Thoughts
This can be used to ensure a smooth startup of a Swing application.
HOWTO: set the title bar icon for a JAVA Swing Application
Overview
To help polish a JAVA application, it is always nice to have a custom icon that shows up in the left corner of the title bar and in the task list. To add this is simple.
Technique
Say you have a project that is using a package of jliststriping and in your jliststriping directory, you have an icon called a3.JPG. Here is how you would do it..
Final Thoughts
This will help add a little polish to your program.
To help polish a JAVA application, it is always nice to have a custom icon that shows up in the left corner of the title bar and in the task list. To add this is simple.
Technique
Say you have a project that is using a package of jliststriping and in your jliststriping directory, you have an icon called a3.JPG. Here is how you would do it..
java.net.URL imgURL = JListStripingForm.class.getResource(
"/jliststriping/a3.JPG"
);
if (imgURL != null) {
  this.setIconImage(new ImageIcon(imgURL,"Icon").getImage());
} // end-if
It is done this way so that you can load the icon from a JAR file.Final Thoughts
This will help add a little polish to your program.
HOWTO: ensure correct JAVA Look and Feel at Program Startup
Overview
Lets face it, the default Java Look and Feel kind of sucks. It looks ok but when you have it next to a native app, it sticks out. Fortunately, the guys at SUN have made it easy to setup your JAVA program to automatically use the system look and feel.
Technique
During init of your GUI, simply add the following code. I like putting it in my constructor for the FORM.
What will happen is that the UIManager will set the look and feel using the System Look and Feel.
Last Thoughts
Using this simple snippet, you can make your JAVA program look more like a native application.
Lets face it, the default Java Look and Feel kind of sucks. It looks ok but when you have it next to a native app, it sticks out. Fortunately, the guys at SUN have made it easy to setup your JAVA program to automatically use the system look and feel.
Technique
During init of your GUI, simply add the following code. I like putting it in my constructor for the FORM.
try {
 UIManager.setLookAndFeel(UIManager.getSystemLookAndFeelClassName());
 SwingUtilities.updateComponentTreeUI(this);

} catch(Exception ex) {
 ex.printStackTrace();
} // end-try-catch
What will happen is that the UIManager will set the look and feel using the System Look and Feel.
Last Thoughts
Using this simple snippet, you can make your JAVA program look more like a native application.
Monday, April 16, 2007
HOWTO: use ANT with JAVA to dynamically create build numbers
Overview
For me, build numbers are very useful. I like to use them where I can so I can keep true to a major, minor, and patch version purpose. The only problem is, how do you automate build numbers in a way that is easy to use in an IDE that doesn't automatically use them? The solution is partially included in ANT and the rest is a little bit of simple project setup.
While you are automating things, why not include simple information about your project bundled with each JAR you create. Including:
The process is also being described from a JAVA perspective but there isn't anything truly JAVA specific. For this reason, the technique could be ported to other language. I just happen to like JAVA so that is what I am using.
Technique
What we are doing is simple:
build.xml Setup
In Netbeans (and probably other IDEs) build.xml is a place to create your own custom build targets. A target needs to be setup for "-pre-jar" as follows
buildnumber.properties
This is a file created and maintained by ANT. If you delete it, ANT will create another starting at 1. The file will look something like this.
appinfo.properties
All of the project summary information will be stored in here. After your first build, there isn't much but you can update the static fields as you see fit. The following is a file that was updated for a specific project.
Using appinfo.properties
Usage can be done in two ways. You can either roll-your-own, or use a pre-existing library I created.
Roll-Your-Own
Rolling your own is not to bad. Simply open the appinfo.properties file as follows:
Using Pre-Existing Library
To save me time, I created a simple library (that will get more tools added over time) that has much of this already setup. If you are interested, see stoken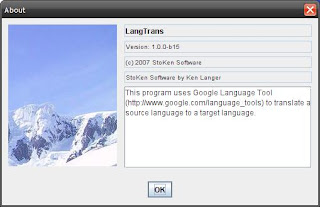 -utils. There is a class within the project all AppInfo that you can hand props (from above). It has some simple static accessors you can use for getting the key values you need.
Within the same library, you will see AppInfoPanel which can be stuck into a JFrame for creating a spiffy about box.
Both are used in a sample program I wrote called language-translate. If you look through this program you will see the usage of both.
Either approach above still requires the build.xml configuration but the second one already knows what to do with it after build.xml does its magic.
Final Thoughts
The technique above should allow you to simply and easily include build numbers and other centrally controlled project information.
UPDATE: I just discovered that if you have the compile on save feature in Netbeans 6.5 on, it seems to prevent appinfo.properties from being copied into your build/classes/... folder. This means that any executions within the IDE will probably fail or have errors/exceptions. I will look at a way around this but until then, turn off compile on save and just do a classic SHIFT+F11 to built before a test run.
For me, build numbers are very useful. I like to use them where I can so I can keep true to a major, minor, and patch version purpose. The only problem is, how do you automate build numbers in a way that is easy to use in an IDE that doesn't automatically use them? The solution is partially included in ANT and the rest is a little bit of simple project setup.
While you are automating things, why not include simple information about your project bundled with each JAR you create. Including:
- Program/Library/Project name
- Author
- Company/Organization
- Copyright
- Description (brief)
- Version (major/minor/patch)
- Build Number
- Build Date
The process is also being described from a JAVA perspective but there isn't anything truly JAVA specific. For this reason, the technique could be ported to other language. I just happen to like JAVA so that is what I am using.
Technique
What we are doing is simple:
- Have ANT create/update a small properties file for us in the root of the jar
- Use a small class or library to open a load this properties file at startup
- Ensure all data is available through static methods for easy access through-out the program
build.xml Setup
In Netbeans (and probably other IDEs) build.xml is a place to create your own custom build targets. A target needs to be setup for "-pre-jar" as follows
<!-- Custom Target for AppInfo.java -->This target can be cut/pasted right into your build.xml as is. It is doing the following:
<target name="-pre-jar">
<buildnumber file="buildnumber.properties"/>
<propertyfile file="appinfo.properties"
comment="Everything can be manually updated except buildnum and builddate.">
<entry key="program.PROGNAME" default="${main.class}" />
<entry key="program.AUTHOR" default="" />
<entry key="program.COMPANY" default="" />
<entry key="program.COPYRIGHT" default="now" type="date" pattern="yyyy" />
<entry key="program.DESCRIPTION" default="" />
<entry key="program.VERSION" default="1.0.0" />
<entry key="program.BUILDNUM" value="${build.number}" />
<entry key="program.BUILDDATE" type="date" value="now" pattern="yyyyMMDDHHmmss" />
</propertyfile>
<copy file="appinfo.properties" todir="${build.classes.dir}"/>
</target>
- Defines an implementation for -pre-jar to the build system
- Creates a new buildnumber to be stored in buildnumber.properties.
- Creates a new propertyfile called appinfo.properties. Within propertyfile many entries are created. All the entries are set to a default that can be updated by hand. These entry tags do not have a value="..." attribute within the tag. The ones with the value="..." will get updated at each build. In this case, the only entry tags affected are BUILDNUM and BUILDDATE.
- Does a copy of the appinfo.properties file to the build.classes.dir so it can be included in the jar for this project.
buildnumber.properties
This is a file created and maintained by ANT. If you delete it, ANT will create another starting at 1. The file will look something like this.
With each build, the build.number will be incremented by 1. You do not need to do anything with this file going forward since ANT maintains it.#Build Number for ANT. Do not edit!
#Sat Apr 14 01:25:36 EDT 2007
build.number=1
appinfo.properties
All of the project summary information will be stored in here. After your first build, there isn't much but you can update the static fields as you see fit. The following is a file that was updated for a specific project.
I manually updated all the fields (using the rules of property files) above except BUILDNUM and BUILDDATE since they get updated dynamically. This is the file that will be included in the JAR output of your project.#Everything can be manually updated except buildnum and builddate.
#Sat Apr 14 01:25:36 EDT 2007
program.PROGNAME=LangTrans
program.BUILDNUM=15
program.AUTHOR=Ken Langer
program.DESCRIPTION=This program uses Google Language Tool.(...)
program.BUILDDATE=200704104012536
program.COPYRIGHT=2007
program.COMPANY=StoKen Software
program.VERSION=1.0.0
Using appinfo.properties
Usage can be done in two ways. You can either roll-your-own, or use a pre-existing library I created.
Roll-Your-Own
Rolling your own is not to bad. Simply open the appinfo.properties file as follows:
That is it. Accessing the values can be done using the props.getProperty(key); method.InputStream in = null;
Properties props = new Properties();
//
// load properties file
//
try {
//
// get Application information
//
in = getClass().getResourceAsStream("/appinfo.properties");
props.load(in);
// DO SOMETHING HERE WITH THE props object....
in.close();
} catch (IOException ex) {
ex.printStackTrace();
} // end-try-catch
Using Pre-Existing Library
To save me time, I created a simple library (that will get more tools added over time) that has much of this already setup. If you are interested, see stoken
 -utils. There is a class within the project all AppInfo that you can hand props (from above). It has some simple static accessors you can use for getting the key values you need.
Within the same library, you will see AppInfoPanel which can be stuck into a JFrame for creating a spiffy about box.
Both are used in a sample program I wrote called language-translate. If you look through this program you will see the usage of both.
Either approach above still requires the build.xml configuration but the second one already knows what to do with it after build.xml does its magic.
Final Thoughts
The technique above should allow you to simply and easily include build numbers and other centrally controlled project information.
UPDATE: I just discovered that if you have the compile on save feature in Netbeans 6.5 on, it seems to prevent appinfo.properties from being copied into your build/classes/... folder. This means that any executions within the IDE will probably fail or have errors/exceptions. I will look at a way around this but until then, turn off compile on save and just do a classic SHIFT+F11 to built before a test run.
Wednesday, March 28, 2007
HOWTO: use Netbeans and ANT to auto-run jarsigner
Overview
There are times when you need to sign jar files. In my world it is is all the time since I tend to favor Java WebStart applications. There are techniques using ANT to auto sign JAR files, however, they require you to include your store password which is ok if your code remains internal but may not be so good if you post it to Google Code.
To get around this, there is a pretty easy to implement solution. I, being the Netbeans fan, will describe it from the Netbeans perspective, however, ANT is ANT so it should work using anything.
Description
There is a file within the ANT build process called build.xml. This file is usually located in the root of your project directory. This file lets you create additional targets without directly changing the core build script. Typical usage for me is to add -pre-jar and -post-jar targets. In this case we are going to add a new -post-jar target that will be responsible for signing all the JAR files in the dist directory.
Within the build.xml's <project> open and close tag, I add the following XML blob.
The script is basic. It gets a listing of all jar files in the dist directory (and sub-directories) and runs jarsigner on it. The following is the script I use (with the obvious passwords changed):
The example above is written in C-SHELL but it could really be any scripting language (even BAT for Windows users).
What You Will See
When you do a build or a clean build, you will see your code compile, be bundled in JAR files and then signed.
That is it. The signed jar files can be verified (jarsigner -verify -verbose...) to confirm that all is well.
Last Thoughts
It is pretty simple to add and remove. It is also handy since you can change the password, alias, keystore,... in one place without having to re-touch every build.xml.
- - -
There are times when you need to sign jar files. In my world it is is all the time since I tend to favor Java WebStart applications. There are techniques using ANT to auto sign JAR files, however, they require you to include your store password which is ok if your code remains internal but may not be so good if you post it to Google Code.
To get around this, there is a pretty easy to implement solution. I, being the Netbeans fan, will describe it from the Netbeans perspective, however, ANT is ANT so it should work using anything.
Description
There is a file within the ANT build process called build.xml. This file is usually located in the root of your project directory. This file lets you create additional targets without directly changing the core build script. Typical usage for me is to add -pre-jar and -post-jar targets. In this case we are going to add a new -post-jar target that will be responsible for signing all the JAR files in the dist directory.
Within the build.xml's <project> open and close tag, I add the following XML blob.
<target name="-post-jar">In this blob you can see a few bits. The main thing is a C-Shell file I wrote, called bulkjarsigner.csh, that has 700 permissions and sits outside my project tree in my personal bin directory (which is in my path).
<exec dir="${dist.dir}" executable="bulkjarsigner.csh" os="Linux" />
</target>
The script is basic. It gets a listing of all jar files in the dist directory (and sub-directories) and runs jarsigner on it. The following is the script I use (with the obvious passwords changed):
#!/bin/cshYou will note that it does not take any command line args at all. It just takes the current directory specified by ${dist.dir} and gets a listing of all the jar files. foreach jar in the list, it runs jarsigner.
#
#
init:
onintr outahere
set KEYSTORE="~/keystore/my.jks"
set STOREPASS="mystorepassword"
set KEYPASS="mykeypass"
set ALIAS="keyalias"
set FILELIST=`find ./ -print |grep ".jar"`
main:
echo "--- Working out of `pwd` ----"
foreach ARG ($FILELIST)
echo "---- Processing $ARG ----"
jarsigner -storepass $STOREPASS -keypass $KEYPASS -keystore $KEYSTORE $ARG $ALIAS
echo " "
end
set KEYSTORE=""
set STOREPASS=""
set KEYPASS=""
set ALIAS=""
goto pissoff
outahere:
echo " "
echo "User Exit..."
pissoff:
The example above is written in C-SHELL but it could really be any scripting language (even BAT for Windows users).
What You Will See
When you do a build or a clean build, you will see your code compile, be bundled in JAR files and then signed.
That is it. The signed jar files can be verified (jarsigner -verify -verbose...) to confirm that all is well.
Last Thoughts
It is pretty simple to add and remove. It is also handy since you can change the password, alias, keystore,... in one place without having to re-touch every build.xml.
- - -
Subscribe to:
Posts (Atom)